Laser Cutter: Difference between revisions
No edit summary |
Eric.diven (talk | contribs) (Add .220" Acrylic to material settings) |
||
| (38 intermediate revisions by 4 users not shown) | |||
| Line 5: | Line 5: | ||
|model=GLS Hybrid-80Ti | |model=GLS Hybrid-80Ti | ||
|serial=S55448 | |serial=S55448 | ||
|manual=[ | |manual=[https://www.gccworld.com/data/file/upload/UserManual/Laser/Spirit-Series-User-Manual.pdf User Manual];[https://www.gccworld.com/download.php?act=view&id=10 Downloads Page] | ||
[ | |||
|shop=Digital Fab. and Electronics Lab | |shop=Digital Fab. and Electronics Lab | ||
}} | |certification=Laser Cutter Certification | ||
|optional certification=Laser Lens and Mirror Cleaning Certification | |||
== Material Settings == | |reservation=https://claremontmakerspace.org/membersonly/scheduler/?cat_id=2&staff_id=15 | ||
{|class="wikitable sortable" | |asset tag=CMS00010}} | ||
! Material Name !! Cut/Engrave !! Power !! Speed !! Passes !! Air? !! Notes !! Tester | ==Material Settings== | ||
Check out [[Laser Cutter/Materials]] for a slightly more comprehensive list of what can or cannot be cut. | |||
See also [https://translate.google.com/translate?sl=auto&tl=en&u=wiki.happylab.at%2Fw%2FLaser_Cutter HappyLab's Wiki], translated from german, for some settings for the 60W version of this laser cutter. | |||
{| class="wikitable sortable" | |||
!Material Name!!Cut/Engrave!!Power!!Speed!!Passes!!Air?!!Notes!!Tester | |||
|- | |||
|Mylar Sheet - 4mil||Engrave||50||50||1||Yes||Used raster to cut all the way through to make a solder stencil.||[[User:David.Bridgham|David.Bridgham]] ([[User talk:David.Bridgham|talk]]) | |||
|- | |||
|Paint||Engrave||17||50||1||Yes||This is to remove a layer of paint||[[User:David.Bridgham|David.Bridgham]] ([[User talk:David.Bridgham|talk]]) | |||
|- | |||
|1/8" Plywood||Cut||90||5||2||Yes|| ||[[User:Sarah.goldsmith|Sarah.goldsmith]] ([[User talk:Sarah.goldsmith|talk]]) 21:40, 10 September 2019 (UTC) | |||
|- | |||
|1/8" Acrylic||Cut||100||2.5||1||Yes|| ||[[User:Sarah.goldsmith|Sarah.goldsmith]] ([[User talk:Sarah.goldsmith|talk]]) 21:40, 10 September 2019 (UTC) | |||
|- | |||
|.220" Acrylic | |||
|Cut | |||
|100 | |||
|0.7 | |||
|1 | |||
|Yes | |||
|This is the nominal 1/4" material available at Home Depot. | |||
Per recommendations on the internet, focus at approximately halfway through material. | |||
|Eric Diven | |||
|- | |||
|Polyester Interfacing||Cut||50||100||2||Yes||Burned a bit, and still needed to be torn out (but this did not damage it)||[[User:Adam.goldsmith|Adam.goldsmith]] ([[User talk:Adam.goldsmith|talk]]) | |||
|- | |- | ||
| | |Polyester Ribbon||Engrave||15||100||1||No||Very brittle, breaks extremely easily||[[User:Adam.goldsmith|Adam.goldsmith]] ([[User talk:Adam.goldsmith|talk]]) | ||
|- | |- | ||
| Polyester | |Polyester Ribbon||Cut||50||100||1||No|| ||[[User:Adam.goldsmith|Adam.goldsmith]] ([[User talk:Adam.goldsmith|talk]]) | ||
|- | |- | ||
| | |Cotton Canvas||Engrave||12||75||1||Yes|| ||[[User:Sarah.goldsmith|Sarah.goldsmith]] ([[User talk:Sarah.goldsmith|talk]]) 21:40, 10 September 2019 (UTC) | ||
|- | |- | ||
| | |Cotton Canvas||Cut||75||50||2||Yes|| ||[[User:Sarah.goldsmith|Sarah.goldsmith]] ([[User talk:Sarah.goldsmith|talk]]) 21:40, 10 September 2019 (UTC) | ||
|- | |- | ||
| 80 Lb. Drawing Paper Medium Surface || Cut || 30 || 35 || 1 || No || Burned very slightly on back of paper. || [[User:Don.Fitzpatrick|Don.Fitzpatrick]] ([[User talk:Don.Fitzpatrick|talk]]) | |80 Lb. Drawing Paper Medium Surface||Cut||30||35||1||No||Burned very slightly on back of paper.||[[User:Don.Fitzpatrick|Don.Fitzpatrick]] ([[User talk:Don.Fitzpatrick|talk]]) | ||
|} | |} | ||
==Personal Computer Setup== | |||
The laser cutter is accessible from the members network. | |||
This is the same network as the WiFi network "CMS-Members" and the Ethernet jacks in the [[Electronics Lab]]. | |||
#First, you will need software that works with the driver: Adobe Illustrator and CorelDRAW are the recommended packages. | |||
#Then you need to install the driver then follow the instructions here: [http://laserprona.com/wp-content/themes/laserprona/files/Ethernet-Connectivity-Setup.pdf Ethernet-Connectivity-Setup.pdf] starting at step 3 (using The laser cutter's hostname is <code>GLS-Hybrid.sawtooth.claremontmakerspace.org</code>. | |||
Alternatively, you can use USB, and the process is essentially the same, just pick the USB port instead. | |||
In both cases, there are a bunch of things that need to be set in the print driver, as well as in CorelDRAW/Illustrator. | |||
I would suggest reading the manual for these settings, as it will not work correctly (if at all) without them. | |||
==Laser Operation Checklist== | |||
===Before Pressing Start=== | |||
*Turn on the laser cutter and allow it to boot fully. | |||
*Verify that you have correctly selected the cutting mode and turned on the air compressor. Raster is for engraving, Vector is for cutting: /Print/Preferences/Pen/ | |||
*Verify that your pen settings are correct for your material. | |||
*Be aware of the cut starting point: /Print/Preferences/Advanced/Position Mode. | |||
*Place your material on the printer bed and secure it if necessary. | |||
*Close the bed chamber door | |||
*Set the Z-Axis height to your materials thickness. | |||
*Position the aiming laser if necessary. | |||
*Turn on the Exhaust switch. | |||
*Turn the key to activate the laser tube. | |||
===After Cutting=== | |||
*Allow the bed chamber to exhaust for ~30 secs before opening. | |||
*If using the Vector function make sure the piece is fully cut, before removing from the bed. | |||
*When completely finished shut down the machine. Turn off the exhaust, the laser key, and the power switch. | |||
*Remove debris from the bed and any pieces that may have fallen through the comb. | |||
===Cleaning=== | |||
The laser cutter's optics are not to be serviced unless you've have been trained and completed the [[Laser Lens and Mirror Cleaning Certification]]. Vacuuming of the honeycomb laser bed and general disposal of used materials and sweeping / vacuuming the area is expected. Leave the area better than you found it. If you are not certified to clean the optics but used the laser a lot, email the shop lead ([mailto:[email protected] [email protected]]) so that they can schedule a service. | |||
==Troubleshooting/Common problems with the GCC Spirit== | |||
If you encounter a problem with the machine, double check your printer settings, Software settings (ie Corel Draw), and Page Layout for common mistakes. | |||
;If you can’t identify the error or suspect an issue with the machine:Turn it off and place an out of order tag on the printer and notify the shop lead. | |||
;Fire:Do not leave the laser unattended. The laser is burning material, it is not uncommon to see flames following the cutting head while its is performing a Vector. You should not see fire/embers anywhere but the location the head is currently cutting. If the Lasers fire sensor detects to much light it will cancel the print and shut off. In the event of a small fire be aware that opening the door will fan the flames. You should attempt to smother the flames or blow them out using canned CO2. | |||
In the event of a fire | |||
;When cutting, the laser seems to be under performing:The Lens and Mirrors most likely need to be cleaned. The Lens and first mirror are behind the panel with three thumb screws. The second mirror is on the far left side of the gantry, held in place by an additional thumb screw. Use a cotton swap to clean the lens. DO NOT use the cotton swab on the mirror, only use the lens paper otherwise you may scratch the mirror! | |||
;If the laser cutter is filling with smoke:Check that the Exhaust/Fume Extractor is turned on. | |||
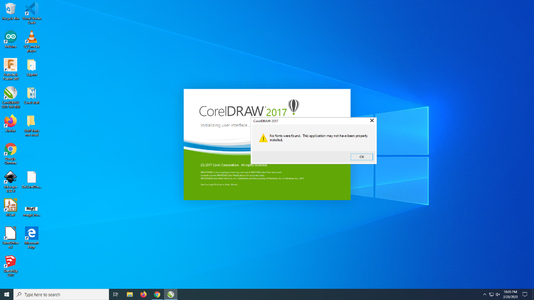
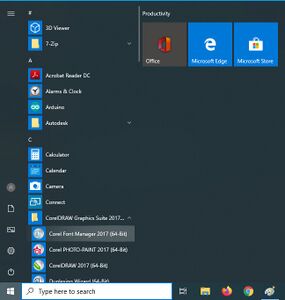
;CorelDRAW won't load because it says there are no fonts being found (or some other font-related error starting CorelDRAW):You will need to restore the font database. Navigate to Start Menu (Windows Icon) > CorelDRAW Graphics Suite 2017. Hold down the F8 key while selecting Corel Font Manager 2017. Check both boxes in the popup and click OK to restore the database settings. | |||
:Exit the Font Manager. Launch CorelDRAW. | |||
If the | :If that doesn't work, you can try deleting or renaming the folder <code>%APPDATA%\Corel\FontDatabase</code> (Windows may not let you delete it). | ||
<gallery heights="200px" mode="packed"> | |||
File:Corelfun.png|The error message. | |||
File:CorelDatabaseReset1.jpg|Hold down F8 when you click to load this. | |||
File:CorelDatabaseReset.jpg|You will see this if the reset is working. | |||
</gallery> | |||
Latest revision as of 20:28, 16 February 2023
| GCC Spirit GLS Hybrid Laser Cutter/Engraver | |||||
|---|---|---|---|---|---|
| Laser Cutter | |||||
| Make | GCC LaserPro | ||||
| Model | GLS Hybrid-80Ti | ||||
| Specs | |||||
| Manual | |||||
| Requires Certification |
Laser Cutter Certification | ||||
| Optional Certification(s) | Laser Lens and Mirror Cleaning Certification | ||||
| Allows Reservation |
Go To Scheduler | ||||
| In Shop | Digital Fab. and Electronics Lab | ||||
| Instances | |||||
| |||||
Material Settings
Check out Laser Cutter/Materials for a slightly more comprehensive list of what can or cannot be cut. See also HappyLab's Wiki, translated from german, for some settings for the 60W version of this laser cutter.
| Material Name | Cut/Engrave | Power | Speed | Passes | Air? | Notes | Tester |
|---|---|---|---|---|---|---|---|
| Mylar Sheet - 4mil | Engrave | 50 | 50 | 1 | Yes | Used raster to cut all the way through to make a solder stencil. | David.Bridgham (talk) |
| Paint | Engrave | 17 | 50 | 1 | Yes | This is to remove a layer of paint | David.Bridgham (talk) |
| 1/8" Plywood | Cut | 90 | 5 | 2 | Yes | Sarah.goldsmith (talk) 21:40, 10 September 2019 (UTC) | |
| 1/8" Acrylic | Cut | 100 | 2.5 | 1 | Yes | Sarah.goldsmith (talk) 21:40, 10 September 2019 (UTC) | |
| .220" Acrylic | Cut | 100 | 0.7 | 1 | Yes | This is the nominal 1/4" material available at Home Depot.
Per recommendations on the internet, focus at approximately halfway through material. |
Eric Diven |
| Polyester Interfacing | Cut | 50 | 100 | 2 | Yes | Burned a bit, and still needed to be torn out (but this did not damage it) | Adam.goldsmith (talk) |
| Polyester Ribbon | Engrave | 15 | 100 | 1 | No | Very brittle, breaks extremely easily | Adam.goldsmith (talk) |
| Polyester Ribbon | Cut | 50 | 100 | 1 | No | Adam.goldsmith (talk) | |
| Cotton Canvas | Engrave | 12 | 75 | 1 | Yes | Sarah.goldsmith (talk) 21:40, 10 September 2019 (UTC) | |
| Cotton Canvas | Cut | 75 | 50 | 2 | Yes | Sarah.goldsmith (talk) 21:40, 10 September 2019 (UTC) | |
| 80 Lb. Drawing Paper Medium Surface | Cut | 30 | 35 | 1 | No | Burned very slightly on back of paper. | Don.Fitzpatrick (talk) |
Personal Computer Setup
The laser cutter is accessible from the members network. This is the same network as the WiFi network "CMS-Members" and the Ethernet jacks in the Electronics Lab.
- First, you will need software that works with the driver: Adobe Illustrator and CorelDRAW are the recommended packages.
- Then you need to install the driver then follow the instructions here: Ethernet-Connectivity-Setup.pdf starting at step 3 (using The laser cutter's hostname is
GLS-Hybrid.sawtooth.claremontmakerspace.org.
Alternatively, you can use USB, and the process is essentially the same, just pick the USB port instead.
In both cases, there are a bunch of things that need to be set in the print driver, as well as in CorelDRAW/Illustrator. I would suggest reading the manual for these settings, as it will not work correctly (if at all) without them.
Laser Operation Checklist
Before Pressing Start
- Turn on the laser cutter and allow it to boot fully.
- Verify that you have correctly selected the cutting mode and turned on the air compressor. Raster is for engraving, Vector is for cutting: /Print/Preferences/Pen/
- Verify that your pen settings are correct for your material.
- Be aware of the cut starting point: /Print/Preferences/Advanced/Position Mode.
- Place your material on the printer bed and secure it if necessary.
- Close the bed chamber door
- Set the Z-Axis height to your materials thickness.
- Position the aiming laser if necessary.
- Turn on the Exhaust switch.
- Turn the key to activate the laser tube.
After Cutting
- Allow the bed chamber to exhaust for ~30 secs before opening.
- If using the Vector function make sure the piece is fully cut, before removing from the bed.
- When completely finished shut down the machine. Turn off the exhaust, the laser key, and the power switch.
- Remove debris from the bed and any pieces that may have fallen through the comb.
Cleaning
The laser cutter's optics are not to be serviced unless you've have been trained and completed the Laser Lens and Mirror Cleaning Certification. Vacuuming of the honeycomb laser bed and general disposal of used materials and sweeping / vacuuming the area is expected. Leave the area better than you found it. If you are not certified to clean the optics but used the laser a lot, email the shop lead ([email protected]) so that they can schedule a service.
Troubleshooting/Common problems with the GCC Spirit
If you encounter a problem with the machine, double check your printer settings, Software settings (ie Corel Draw), and Page Layout for common mistakes.
- If you can’t identify the error or suspect an issue with the machine
- Turn it off and place an out of order tag on the printer and notify the shop lead.
- Fire
- Do not leave the laser unattended. The laser is burning material, it is not uncommon to see flames following the cutting head while its is performing a Vector. You should not see fire/embers anywhere but the location the head is currently cutting. If the Lasers fire sensor detects to much light it will cancel the print and shut off. In the event of a small fire be aware that opening the door will fan the flames. You should attempt to smother the flames or blow them out using canned CO2.
- When cutting, the laser seems to be under performing
- The Lens and Mirrors most likely need to be cleaned. The Lens and first mirror are behind the panel with three thumb screws. The second mirror is on the far left side of the gantry, held in place by an additional thumb screw. Use a cotton swap to clean the lens. DO NOT use the cotton swab on the mirror, only use the lens paper otherwise you may scratch the mirror!
- If the laser cutter is filling with smoke
- Check that the Exhaust/Fume Extractor is turned on.
- CorelDRAW won't load because it says there are no fonts being found (or some other font-related error starting CorelDRAW)
- You will need to restore the font database. Navigate to Start Menu (Windows Icon) > CorelDRAW Graphics Suite 2017. Hold down the F8 key while selecting Corel Font Manager 2017. Check both boxes in the popup and click OK to restore the database settings.
- Exit the Font Manager. Launch CorelDRAW.
- If that doesn't work, you can try deleting or renaming the folder
%APPDATA%\Corel\FontDatabase(Windows may not let you delete it).
-
The error message.
-
Hold down F8 when you click to load this.
-

You will see this if the reset is working.


